Pages

Wednesday, May 29, 2013

New at my Etsy Store


I listed a couple of new items at my Etsy Store.

First, my new designs of dollhouse miniature rugs for 1/12th scale.

Dollhouse Miniature Needlepoint Pattern Rug "KAZAK", 1/12 scale, 4.38" x 6.13" (11.11 x 15.56 cm), 40 count silk gauze


Dollhouse Miniature Needlepoint Pattern Rug "KAZAK", 1/12 scale, 4.33" x 7.08" (10.99 x 17.97 cm), 40 count silk gauze


Dollhouse Miniature Child Mannequin kit 1/12th scale. That is true, it is a child mannequin. McQueenie company made it so realistic that I had a couple of transactions when somebody bought that kit and then returned back, because they thought that it is a real size child mannequin. Makes me think if they read the description before to purchase things, lol...


I also got today a kit for HBS contest.


I did a dry fit, the kit is easy to assemble. Just sketching, thinking and planning...

What are you working on?

Natalia

Tuesday, May 28, 2013

Edwardian Lady - Vanessa's Roombox


Last weekend I've been busy with working on the first floor of my Spring Fling 2013 project. I didn't imagine it could be sooo addictive! The exterior walls are done and now I am thinking about the interior walls and How-To...

Closer to the afternoon I went out of supplies and had to stop working on the building. It gave me time to concentrate on Vanessa's roombox. After long hesitation I decided to attach the ceiling medallion and hang the lamp.


The William Morris rug that I decided to put in this room was stitched by me years ago on 22 count (before I was introduced to silk gauze), Bunny Papke's pattern.


Now I am looking for a suitable fabric for the window treatment, can't figure out what color I want.

I also finished a couple of Country pillows that will be available at my Etsy store soon.


Have a great Tuesday!

Natalia

Monday, May 27, 2013

Molly Cromwell's Sturbridge Miniature Festival


Last year I won a free scholarship to the IGMA school that is located in Castine, but due to the family circumstances didn't have a chance to go there. The airplane tickets were booked. Unfortunately, the airline company refused to refund money, based on their policy they left money on my account and gave me a possibility to use it till the 7th of June, 2013. Hmm, where to fly before the 7th of June in order not to lose money?

I've heard so many great comments about Molly Cromwell's shows, and she has one of them just at the beginning of June. Great!

On the 31st of May I fly to Boston, Massachusetts to attend Molly Cromwell's Sturbridge Miniatures Festival at the beginning of June, 1 and 2, as a dealer.

Since I will have the whole day of the 1st of June free before setting a table up, I decided to take a class MONET’S PAINTING OF POPPY FIELD by JOSEPHINE MEYER. You can see her work here: http://www.joart.com/

Here is the painting we, students, will reproduce using fine sable brushes.


I always loved oil and watercolor painting, just for myself. Now I want to try my hand in miniature painting. Wish me good luck!

Natalia

Sunday, May 26, 2013

Outside of Miniature Life


Did I tell you we moved?

Yes, we bought a house and moved to the beautiful and very picturesque area where there are a lot of lakes to fish, the river, a lot of hills to hike. My Sweetheart and I love hiking. Usually it took us about an hour to drive to the places of hiking from the previous place we used to live, now it takes us the most 8-10 minutes.

This year we started hiking pretty early - at the beginning of February.

Knowing that we have a lot of hiking paths to explore we started with the closest. The first thing we paid attention at the information board was a list of wild life in the area. We were warned, that the area we were going to hit is full of rattle snakes. It was first time we saw the sign about rattle snakes. The path is not long, only 2,5 miles along the river.


I was leading and looking around and deep inside the bushes on the sides of the path instead of looking in front of me. I must tell you it was the most ALIVE and full of wild life path. We saw ducks, little cute bright green frogs with red eyes that can fit on your thumb (frogs, not the eyes, :))), a dear crossing the path a couple of yards in front of us. Just amazing! And, can you believe, I didn't have a camera with me! Oh, I was sooo upset.

So close to the end of the hiking route I saw something moving on the road. OMG! Big, long and fat tail of a snake! His head was hiding in the bushes! My husband is fascinated with the snakes, he reads about them, he watches shows about them, he studies them. Here he finally saw a real alive bullsnake!


I automatically jumped back, my hubby instead of turning around and follow me, came closer to investigate it. The snake hid in the bushes and as soon as Jim heard rattling sound he made a smart decision to turn around, but he saw his head and eyes staring at him.

The fact about the bullsnakes is that they average about 6-8 feet (1.8 m) in total length. Adult specimens have been weighed from 1–3.6 kg (2.2–7.9 lb), though the heaviest known specimens can attain 4.5 kg (9.9 lb. This makes the bullsnake among the largest snakes native to the United States. Bullsnakes are sometimes mistaken for rattlesnakes, because they perform an impressive rattlesnake impression when threatened.

Even though a Bullsnake is considered to be not a poisoned snake, I insisted on turning around.

With only one thought to leave that place as soon as possible and came home saved and not to have a rattle snake on our way, we directed our steps back to the parking lot. We arrived there safely but unsatisfied: it was the first hiking route we haven't completed! It means one day we MUST come back!

What would you do? Would you come back next time and finish it or just forget about it?

Natalia

Saturday, May 25, 2013

Friday, May 24, 2013

Greenleaf Kit Arrived - Spring Fling 2013


I am so excited: the Greenleaf kit for Spring Fling 2013 arrived today.


Yes, this not too big, not too heavy box is full of fun and excitement and has everything I need to start my first Spring Fling!

In spite of my curiosity to see what is inside I didn't open it right the way, nope! I put it in the living room in the place where it can be seen from any angle and pictured all possible ways of manipulating the parts of the kit in my mind. Then, finally, when I was done visualizing my project, I opened the box and, IT IS ON....

I did dry fit and this is how it looks like now:


Do you like it?

Natalia

Thursday, May 23, 2013

TUTORIAL: How To make a Dollhouse Braided Rug


Today I would like to show you how I make dollhouse miniature braided rug.


You will need:

1. A piece of clear glass 12" x 12".

2. Masking Tape

3. Double-sided tape

4. Plastic thread clippers

4. Fusible One-side Stabilizer

4. DMC floss

5. Tacky glue

6. Scissors

7. Iron

All materials can be purchased at any craft stores like Michaels, Jo-Anne, Hobby-Lobby, Ben Franklin, etc...

After you prepared all necessary items,:

1. Take a piece of clear glass 12" x 12". You can have any size of glass, depends on the size of a rug you braid. I had yellow glass. I will explain later why you need a piece of glass and not a piece of paper, card board or wood.

2. Using a masking tape (in my case it is a blue one) secure all 4 sides of the glass piece to prevent from hurting yourself.


3. Using the double sided tape cover one side of the glass piece between the stripes of masking tape. Try not to overlay the double-side tape over the masking tape.


This is how it looks now


Try not to leave any empty space between the rows of the double-side tape.


4. Now, take the DMC floss you are going to use for the project.


Unfolded it.


5. Prepare clippers.


Wind your thread on a plastic thread clipper,


each color on its own clipper.


Secure the thread on the clipper.


6. In my project I used only 3 colors. That's why I have only 3 clippers.

7. Put all 3 tails of threads together and make a knot.


8. Start braiding. There are a lot of different types of braid that are suitable for braided rugs, in this project I used a simple one.


Don't braid neither tight nor loose.


9. After you braided about 5" you need to start winding the knotted end of your braid on a piece of cardboard, size about 2" x 5".


Finish braiding the floss and secure the end with another knot.


It is the most time consuming process in the process of braiding rugs. You can do it while watching TV.

It is ready now:


10. If you use more than 1 color in your project, you need to braid more braids of different shades.

11. Back to the glass piece. Take the end of your braid and stick it to the surface of the glass piece covered with the double sided tape leaving the knot up into the air.


Closer to the glass piece cut the braid and secure the cut piece on the double sided tape (don't use glue!)


12. Depending on the size and shape of your rug, secure 1" (for a round rug) or 1,5" (for the oval rug) the braid on the glass piece.


13. Start placing the braid around this straight piece, one row after another.


14. After 2-3 rows are completed, take your glass piece and turned it upside down or, as I do, take it above your head and look at the rug from another side of the glass.


It will show you if you made any mistakes so far or not, for example, if you see the space between the rows, you still have time to correct it. Sometimes rows of one side of the rug look tighter then the rows from another side.

15. Finish your rug.


16. To secure the end of the braid, placed it on the top of the previous row at the place when the thread ended and secure it with a little dab of Tacky glue.


After it dries you won't be able to say where it ended up.


17. Take a piece of Fusible One -Side Stabilizer (pick the finest) bigger size than your rug


and place it on the top of your finished rug with the sticky side.


18. Using hot iron (be sure you don't use a steamer), iron it.


Be sure to iron the place where the edge of the rug is and the middle of it very well.


19. Let it cool down. After that gently start pulling it up.


20. Take the scissors and cut around the edges of your rug.


21. To flatten the rug better, you can cover its front side with a piece of cotton and iron again. Let it cool down again.

22. Your rug is ready for a display.


As I said, my rug was made only with 3 colors. If you decide to use more than 3 shades, there can be a question how to secure the ends of the thread to add to the design. In this case, refer to step 16 and repeat it as many times as you add a new braid.

At the end I would like to advice to keep your glass piece in the box to prevent it from the dust.


I hope this information was useful and easy to follow.

Happy braiding!

Natalia

Wednesday, May 22, 2013

New Plans for the Year


I really didn't want to post anything in between the posts about the Dollhouse miniature Heris Serapi I am working on but couldn't resist to share with you my new plans for the year.

This is my first year I decided to participate in a couple of contests. I saw the kits and loved the ideas that popped up in my mind. What else I like about the contests that they have a deadline. Hopefully I will stay within a time frame and will be able to finish the projects in time.

The first contest is organised by Greenleaf - Spring Fling 2013.

http://www.greenleafdollhouses.com/


The second contest is organised by HBS at www.miniatures.com, Charming Cottage Shell Kit

http://www.miniatures.com/Enter-Creatin-Contest-W6.aspx


and last but not least, is organised by Real Good Toys company, Bistro Challenge Dollhouse Kit

http://www.realgoodtoys.com/products/bistro-challenge-dollhouse-kit


Comparing these 3 projects, I can say that Spring Fling 2013 will be a creative one, Cottage Project will be all about labor, lol..., and Bistro Challenge project will be more practical for all my minis I collected all over the years.

If you ask me how I can pull it out with 3 projects at the same time, I can tell you that I don't know, but I am looking for a fun. Another good thing about Real Good Toys Contest is that the deadline is in February 2014 and when the first 2 is over I still will have time to finish Bistro Challenge.

What kit is striking your attention more?

Natalia


Tuesday, May 21, 2013

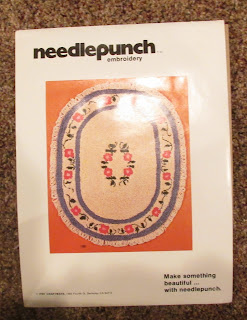
New Project - Punchneedle Rug From the Kit


To have a little bit of brake from petite pointing, last weekend I decided to start a punchneedle rug from the kit that has been in my stash.


The most important thing is to find a special Punchneedle fabric and stretch it on the frame. I used very fine Russian Punch needle that is also called "Igolochka" (Иголочка).

This is the picture of the kit I have


Here is a picture of a rug from my collection that has been done with French knots. The design and colors are beautiful but the thickness of this rug is out of 1/12th scale.


I've been asking myself if there is any other types of needlework to make a rug as close to the scale as possible?

The reason why I keep experimenting with the Punchneedle is that the process of working on it is very, I mean it, very fast, there is no any comparison with the petite pointing, and I like that look, but... in spite of the fact that the punchneedle rugs look beautiful and give absolutely different touch to the miniature scene, I consider this type of rugs to be out of scale... Unless if I am doing something wrong...

Anyway, I will finish this Punchneedle rug, and I am sure later, some day, I will make another one, but for now I will devote my time to petite pointing.

So, what is important in miniature world in your opinion: to be close to the scale or just to have illusion of it?

Have a great day,

Natalia