Showing posts with label Edwardian Lady. Show all posts

Thursday, June 6, 2013

A couple of updates on my current projects...


I prepared working today on a doll Annaliese based on Dana Barton's pattern. Here is a picture of an original doll with a doll I am going to dress.


Even though the original Annaliese is gorgeous, I want to give her a little bit different look.

While I've been thinking what exactly I would like to change, Vanessa brought that old chair and a revolving stand inside her room. I, personally, don't like the chair and thinking switch it on something more elegant later, or just change the seat cover at least. I didn't like where she put the revolving stand either. So, it will take time when we agree on something and will show more details.


I am working on Spring Fling 2013 project each day adding small details. Today I finished the second interior wall (there are total of 4 walls) on the first level! OOps, did I tell too much? Is it a cat in a box?


And last but not least, today I spent about 6 hours working on scroll saw. It won't be a miniature piece, it will be a candle holder in real size. One piece more left to be cut, the one that you see on the blue background. I need to practice my scroll sawing skills more since I am planning to use them working on my Charming cottage from HBS 2013 contest. Hint! Hint!


Now you know hat I am working on this week.

What about you?

Natalia

Monday, June 3, 2013

Edwardian Lady - Vanessa's Roombox


Sometimes life brings unexpected gifts. In my case, there are so many of them that, one would think, I would have built already a protective shield against them, but how you know?

Two nights before my flight to the Sturbridge Miniature Festival, my daughter had a severe fever following by a barking cough. I made a decision not to go and stay with her. We visited a doctor's office, but I am not going to take you to that level of frustration, you know, everything is the same: Take Tylonol, Allergy, etc... Today she is great, no fever, no cough, she is back to the school, happy and smiling. Makes me think if it was the reaction of her body on the fact I had to leave, lol...

I didn't have a chance to attend the Painting class by Josephine Meyer (www.JoArt.com), but hope I will be able to do it at the Good Sam show this coming Fall, where she is giving another class. No more surprises, Nataly!

Last Sunday I finally came up with a final decision on the curtains for the Vanessa's roombox. Following the advice of Margaret (http://petit-parterre.blogspot.com), I picked up something that "won't compete with the rug for attention, something to match the wallpaper". I have a very beautiful antique Bobbin Lace in some Ivory Sandy Creamy color,


and made curtains from it:


Vanessa approved my choice:


Then she looked out of the window trying to see what makes the noise she heard, but it was too dark outside, she couldn't see anything. I didn't tell her, but she forgot to put her glasses on...


Later on, Vanessa had another dilemma to deal with: what desk to chose for this room. It gave her a headache.

This desk seems to be too big and it is not a writing desk


This desk seems to fit the room and atmosphere, true? Let's call it a day.


We hanged the Tiffany Lamp back, put a plant stand with a plant on it in the corner, desk to the wall and carpet on the floor, and I send Vanessa to sleep, it was too late...


By the way, Blogger keeps making me upset because I can't place the images in the center of the page any more as I used to before.

See you tomorrow!

Natalia

Tuesday, May 28, 2013

Edwardian Lady - Vanessa's Roombox


Last weekend I've been busy with working on the first floor of my Spring Fling 2013 project. I didn't imagine it could be sooo addictive! The exterior walls are done and now I am thinking about the interior walls and How-To...

Closer to the afternoon I went out of supplies and had to stop working on the building. It gave me time to concentrate on Vanessa's roombox. After long hesitation I decided to attach the ceiling medallion and hang the lamp.


The William Morris rug that I decided to put in this room was stitched by me years ago on 22 count (before I was introduced to silk gauze), Bunny Papke's pattern.


Now I am looking for a suitable fabric for the window treatment, can't figure out what color I want.

I also finished a couple of Country pillows that will be available at my Etsy store soon.


Have a great Tuesday!

Natalia

Monday, December 3, 2012

Sunday is over...

What a wonderful day we had today! We decorated the house for the coming Christmas. Each year we buy a real Christmas tree and this year was not an exception. In spite of the fact that my dear husband and I agreed not to work (we have a family-based business and work all days long, :)))) and spend more quality time with the kids during the weekends, I couldn't help myself not to put together another wonderful kit from McQueenie Dollhouse Miniatures for my roombox "Edwardian Elegance". Thanks to Lynne and Bernard, the owners of McQueenie Miniatures, their kits are fast and easy to assemble.


Now I will wait till the plant stand and this revolving stand will dry. I still haven't decided yet what I am going to do with the roombox, will I leave it the way it is now or enlarge it. I will think about it tomorrow, don't want to do it now.

And last but not least, I also managed to stitch a real size project "Angel of Dreams" for my daughter's birthday in March 2013. I started working on it on the 30th of November and each day I try to devote at least 1 hour to it. Here is a result of my 3 hours and 30 minutes of cross stitching:


Not too impressive for almost 3 hours, hmmm...

Welcome to a new week! Have a great and creative Monday!

Natalia

Sunday, December 2, 2012

Dollhouse Blue Aubusson Rug - Day 6

Today I've had an opportunity to pick up my Blue Aubusson Rug and work on it. Even though it has been more than a week I worked on it, it is the 6th day of actual stitching.

I finished stitching the outer border and as you can see not much left!


I am using 35 count silk gauze and DMC + Gutermann silk for this project.

I also put together a plant stand using McQueenie Dollhouse Miniature kit made from cherry, finished it with Lemon oil


and it is ready to be displayed with this simple plant in a simple pot (the tutorial for which you can find here http://scarletsailsminiatures.blogspot.com/2010/12/tutorial-beths-house-plants.html )
in my roombox "Edwardian Elegance", just need to finish working on the roombox.


Last but not least, I would like to introduce you my new blog about New Me.


Today I started 2 New Challenges: Squats and Push-Ups Training Programs.

Do you dare to join me?

http://thesummerthoughts.blogspot.com/

Enjoy your Sunday!

Natalia

Thursday, November 29, 2012

Edwardian Elegance - Work in Progress

Vanessa's dress is fixed and draped, her shoes have heels now, and the doll will be standing. I love this doll and appreciate a lot the fact that she can stand on her own without a doll stand support. Her Edwardian hat and umbrella will be added to the composition later.


I also put a little roombox together with a window today, and even had time to apply Edwardian wallpaper.


Now I am debating: do I want a bigger roombox where Vanessa's bedroom and a part of her office will be showed up or just to go with a part of her office roombox like you see below?

It seems a little bit small for me.


What do you think?

From sunny Spokane,

Natalia

Tuesday, November 27, 2012

Edwardian Elegance - Work in Progress

Vanessa finally got her shoes. The heels are still missing, I am working on them.


Nothing super fancy. Actually, it appeared, that the doll has big feet and it makes it a little bit harder to come up with something elegant, but I don't give up, and will keep experimenting.


At least, she can take her shoes off and give a rest to her feet.


The dress was made based on the Kathi Mendenhall's pattern with a little modification. I am very happy with the choice of fabric I found for Vanessa's dress. Now my big question is: do I want her to stay in the composition, or to sit on the chair? It is a big question for me, because based on my decision it will depend on how to drape her dress. Any suggestions, please?


Have a great Tuesday!

Natalia


Saturday, July 28, 2012

My Doll and Her Heels

Here I am back with my doll. Ha-ha-ha! I found the solution for her heels.


I almost gave up on her and almost sent her to the UFO box. It was one of those pains on my neck when I actually couldn't sleep, or at least I went to the bed with only one thought: what to do to get rid of her heels.

As I told already, the idea to replace the feet didn't work for me. I didn't want to paint the feet either, and the thought to glue the fabric/leather on her legs was like a nightmare for me.

If you do something, do it correctly, true?

I wanted to make real shoes for her that she could take off and back on if needed.

I tried to sand the heels of with a sandpaper. HA-HA-HA! Naive me.

I tried to scroll saw them away - broke a blade! Only that black line appeared on the foot.


I must tell you: DON'T GIVE UP! If you can't think about anything, remember, you have friends with tons of ideas and advises.

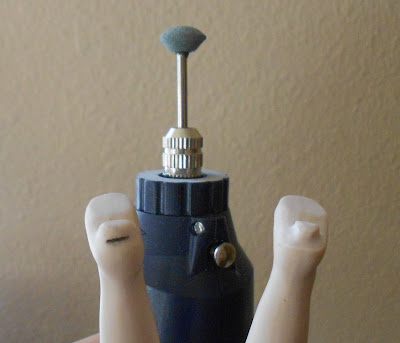
My Russian friend Victoria (http://inchscaled.com) offered to try a mini rotary tool. I did and it worked. SO EASY! Одна голова - хорошо, а две лучше! It took me probably about 10 minutes per each foot to get rid off those heels that have been on my way! Vika, thank you very much!


I was very careful trying not to brake the feet. As soon as I saw a little hole that Casey (http://caseymini.blogspot.com) warned me about, I stopped digging it.


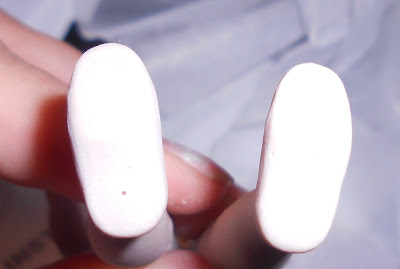
Even at her age it is possible to have sexy legs


Now I can make shoes and slippers just for her feet!

Happy Natalia

Sunday, July 22, 2012

Have a Question...


Do you remember I told you that I purchased an undressed doll - a lady in her age - at the show in Montana?

So, today I wanted to work on her and this lady comes with heels.


I wanted to make my own shoes for her and stumbled upon the question how to get rid off those heels. I tried to sand them out with an electrical sander but surprisingly for me it didn't work out.

Any advises on how to get rid of the heels will be highly appreciated. I hate to see her feet to be painted. I want to make the shoes that I can take off her tired feet and put slippers on!!! Folks, ideas please...

Natalia, helpless in Seattle, or close to it...

LinkWithin

Related Posts Plugin for WordPress, Blogger...