Monday, April 28, 2014

Once In A Blue Moon - Day 6, 7, 8 - How I Made The Floor


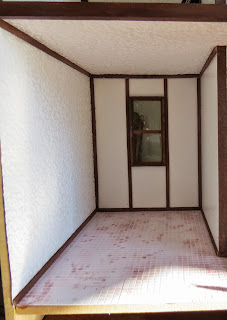
The floor on the first level in the main room is finished.


I had two pieces of Dark Walnut and Maple.


I cut them in 1/2" wide stripes, arranged accordingly the colors and jointed them with the small pieces of tape.


After that, I put this sheet between 2 plywood pieces (1/6") and cut it in 1/2" wide stripes again


I arranged the new cut stripes trying to build a chessboard design


It was a bit challenging to take the tape off, because the wood was so fragile and as you see, I broke some tiles


However, I was pretty satisfied with the result when the floor was put together


More than that, since this sheet was in between 2 plywood pieces, now I have stripes to finish the floor for some other project, may be for my castle!


but let's go back to the floor. Since the house was put already together, it was not very comfortable for me to put a stripe after stripe straight on the floor in the room. I covered the stripes with the tape again, glued it to the thin board with the other side (without a tape), took the tape of, sanded the whole surface, finished it and the floor was ready to be transferred to the room.


Thank you for your time!

Natalia

Friday, April 25, 2014

Punchneedle Rug - Springtime Bunny - Shaved and Ready!


I didn't make you wait long, did I? Don't you have a desire just step on it with your mini bare feet? It feels so fluffy in touch...


It was really a fun working on this colorful Punchneedle rug "Spring Bunny". It took me a couple of hours during 3 days to finish it. Can't compare with petit point in miniature, however the scale that Punchneedle rugs in miniature come in is still under a question for me.

That is why I didn't apply any background on the back side of the rug.

The Springtime Bunny punchneedle rug is shaved and ready. It measures a little bit more than 2" x 3".


I shaved the rug. I like this technique, however I didn't take the pictures of the process.

I tried to make close-up pictures of the shaved pile...


Shaving doesn't damage the loops and the result is fabulous. With my next Punchneedle rug I will try another technique, but later about it...

I didn't finish the back side, but applied non-fraying solution. The reason is I am trying to be as close to the scale as possible and think that any application to the back side of the punchneedle rug makes it out of the scale. What do you think?


I also came up with my own design for my next punchneedle rug in 1/12th scale and it is ready to be transfered on the fabric, but later about it, for now just a sneak peak of a pattern...


Have a great weekend!
Natalia

Thursday, April 24, 2014

Punchneedle Rug


My Springtime Bunny in Punchneedle completed!


I made the long loops in purpose: I will shave them.


I will show you the result when the rug will be completely finished.

Thank you and have a great day!

Natalia

Wednesday, April 23, 2014

Punchneedle Rug


I don't give up and keep trying to find the comfortable zone for myself to make a punchneedle rug in scale.

I had this pattern Springtime Bunny (I am sorry, I can't recall the name of a designer right now) in my stash for a while and decided to practice on it.

This is how much I made today:

back side


front side


I am planning to finish it tomorrow.

Have a great day,
Natalia

Monday, April 21, 2014

Dollhouse Room Box Over The Weekend


While I am working on the floor in the last room in Blue Moon Cottage - in between the sessions of cutting-sanding-gluing-sanding-finishing - I decided to make something else. That "something else" is a room box I finished over last weekend and put for sale.

The process of work on this room box was so fast and interesting that I forgot to take pictures, and the process is all the same: cutting, sanding, painting, gluing, decorating...

That's why I will show the pictures of a finished room box only.


The room box measures 10 3/4" wide X 9 3/8" high X 6 3/4 " deep. It has a removable acrylic pane.

The outside walls of the box were covered with an embossed paper imitating the bricks walls. The walls were trimmed and colored in white.


The floor is real hardwood naturally finished. Inside the walls and ceiling are decorated with wallpaper. Molding and baseboard are colored in white.


I am very pleased with the result. I hope a new owner will be too.

Thank you for stopping by and have a great day!

Natalia

Saturday, April 19, 2014

Once In A Blue Moon - Day 5


For a small room (probably a kitchen) on the first floor I used a styrene sheet in 1/24th scale and colored the tiles with Prismacolor permanent pens randomly.


One more room is finished.


Next step will be the floor on the main level.

Have a great weekened,
Natalia

Thursday, April 17, 2014

Dollhouse Miniature Antique Petit Point Kazak Rug in 1/12th scale - Work In Progress


It has been for a long time I worked on my Dollhouse Miniature Antique rug Kazak in 1/12th scale.

Just want to remind that I am stitching it on 49 count silk gauze with Gloriana over dyed silk. The finished rug will measure approx. 6.5" x 8.5".

I am almost done with the main border. Almost... As you can see, I outlined the design in the outter border with black colr and now will "color" it.


and this is how the rug looked last time


Can't wait to start working on the center of the rug, though the design is not ready yet...

Tuesday, April 15, 2014

Once In A Blue Moon - Day 4


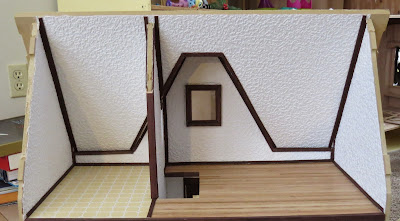
The floor on the second floor is sanded, stained, in a word - finished, and I am very happy with it.


I finished trimming the walls inside the house on the second floor.


next step is to finish a small room on the first floor.


Have a great day!
Natalia

Sunday, April 13, 2014

Dollhouse Miniature Petit Point Savonnerie Rug - Work In Progress - 3


A little progress on a huge project - Dollhouse Miniature petit Point Savonnerie rug in 1/12th scale. It took me another 2 hours to stitch these elements.


to be continued...

Friday, April 11, 2014

Once In A Blue Moon - Day 3


All walls inside the house are wallpapered!


I also trimmed the opening on the second floor with stained sticks.


My next step is to finish the floor on the second level.


I prepared some sticks


and cut them evenly


more later...

Thursday, April 10, 2014

Once In A Blue Moon - Day 2


Back to my Blue Moon Cottage. I applied wallpaper to imitate stucco walls and covered the floor in one room with tiles, actually embossed paper imitating the tiles...


I also stained sticks that I am planning to use to trim the walls inside the house.


This wallpaper will be used for the entire house. Looks simple but this is how I roll right now.

Natalia

Wednesday, April 9, 2014

Dollhouse Quarter Scale Petit Point Firescreen - Update


Fast update on my dollhouse petit point firescreen in a quarter scale.

I finished petit pointing a design for a quarter scale firescreen.

It took me approx. 1 h and 20 min to finish it. There are total of 97 stitches, 8 colors and I used 112 count silk gauze. There was no sense to stitch background that's why I left it unfinished.

Honestly, I am not impressed with the result. You can hardly see all colors I used and even identify the design. Just to compare and see what I mean I decided to petit point a pillow in a quarter scale with the same result but on 60 count silk gauze. I am almost done with the pillow (working on the background) but already can see how 2 projects with the same design are absolutely different being stitched on different counts of silk gauze.

Don't you agree?


Tuesday, April 8, 2014

Dollhouse Quarter Scale Petit Point Firescreen


Little Teaser today for you...

A year ago I was certain I will never work in smaller than 1/12th scale. Now I am leaning more towards at least to try it. Many interesting kits in a half and quarter scale came on the market recently. It comes to the furniture and dollhouses as well.

I've never thought I would ever try to petit point for a quarter scale, but inquired recently this delicate laser cut firescreen in a quarter scale from Suzane Herget and decided to give it a try on... 112 count silk gauze. The diameter of the screen is only 0,5 cm or 6/32".


I was so intrigued to start working on it and designed a little flower chart that measures only 12 x 13 stitches but on 112 count silk gauze, and honestly to say, I have never worked on this count before. As you can see, I've started petit pointing mini flower already. I do it free hand without a hoop that let me save a piece of silk gauze. I do use superfine silk made in UK and a beading super thin and long needle.


It won't be long till I finish working on it because I am impatient to see how it looks like in a quarter scale.

Happy Wednesday everyone!

Natalia

LinkWithin

Related Posts Plugin for WordPress, Blogger...