
I started with a pattern that is called "Minuet" designed by a talented embroidery artists Colleen Goy. "Prelude" is one of a series of miniature Jacobean designs. They are called "miniature" because they measure only 11 cm x 9 cm.
I was very excited to start this design and finished it in 3 days.

The picture doesn't give a justice and the quality of it leaves much to be desired, so I decided to give you a step-by-step description of a process itself. I hope you will enjoy it as much as I enjoined stitching it.
This is how it looked like before I started

The 2 top Petals were worked with Cretan stitch and outlined with Chain stitch. Edges were worked out with a Buttonhole stitch on side of each Chain stitch but not through the background.

The 2 Large Gold-edged Petals have been done with alternating Long stitches of Light Brown, Light Blue and Gold Metallic thread. The edges are done with Buttonhole stitch using the Gold Metallic thread.
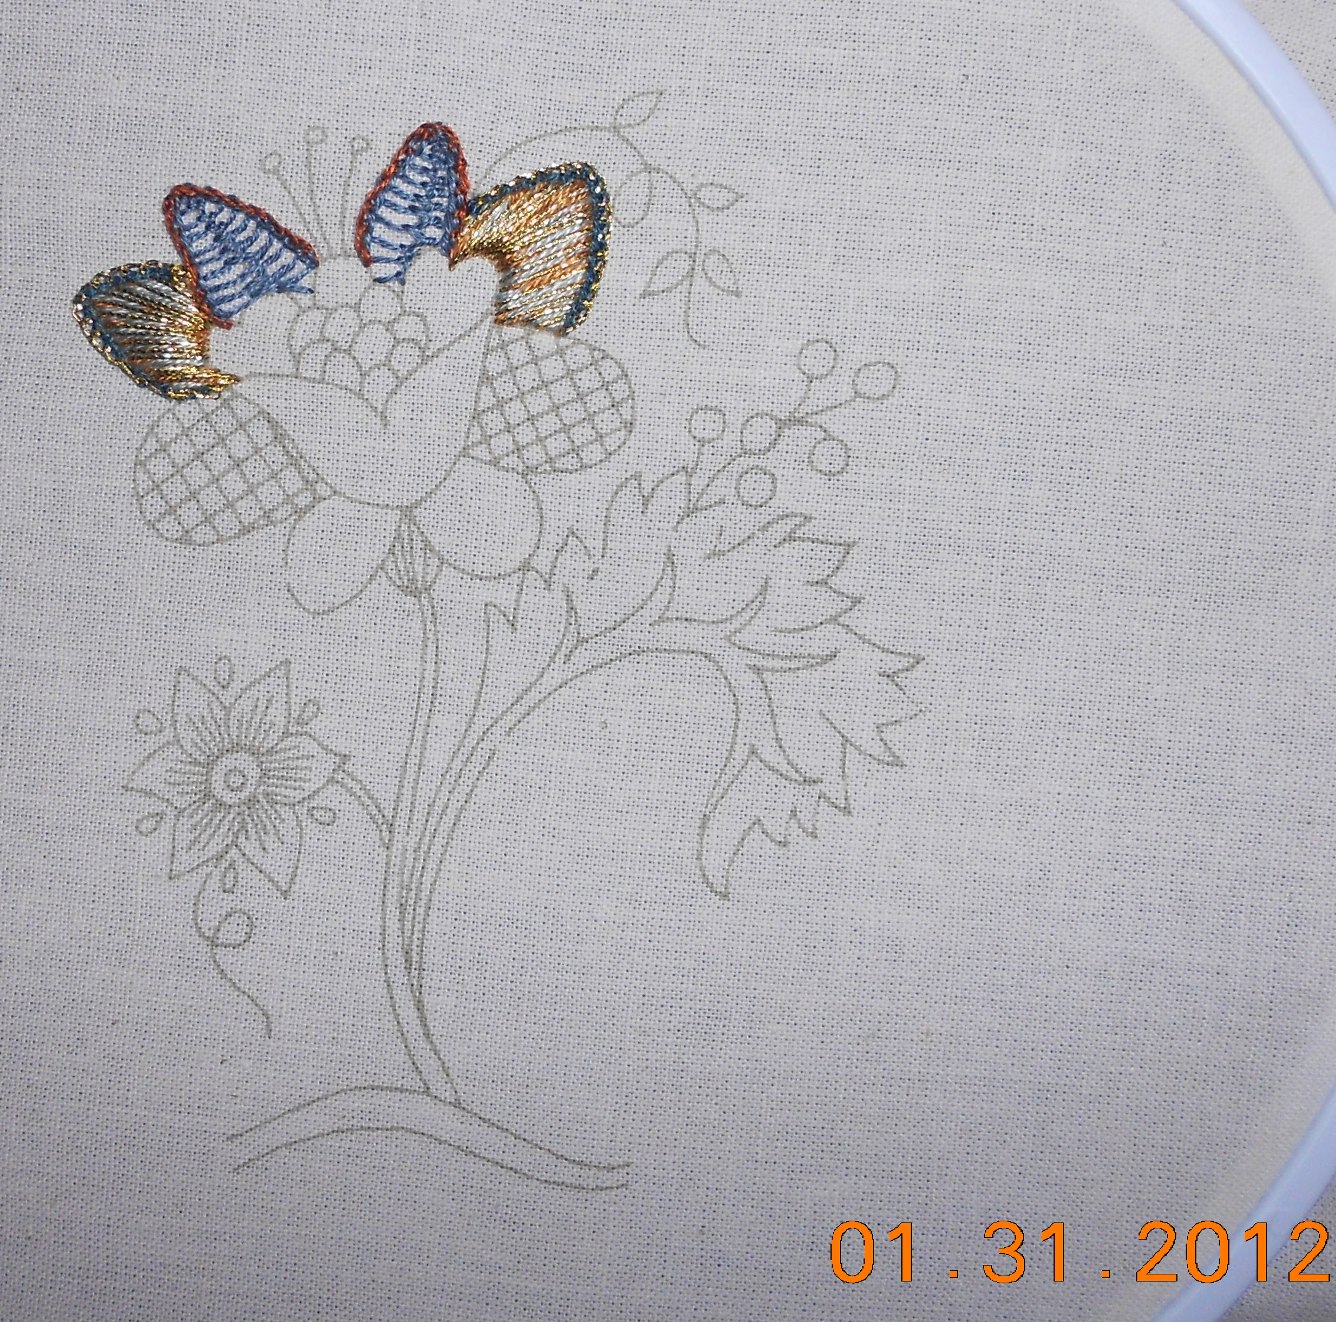

The small, heart-shaped Petals in Light Brown are covered with diagonal Satin stitch after padding. Then I did 3 horizontal Straight stitches evenly spaced across the Satin stitch and added 6 Fly stitches of Dark Turquoise over the horizontal stitches.

The tip of the centre section is sewn in padded Satin stitch.
The scalloped centre is sewn in padded Buttonhole stitch using Medium Blue, Dark Blue and Dark Turquoise.
The lower part of the centre of the Flower is filled in with rows of Chain stitch.


The 2 Trellised Petals are done in Straight stitch using Dark Blue and Gold Metallic thread. The shape was outlined with Double Knot stitch.

The Lower Petals are sewn with Buttonhole stitch over diagonally padding stitches and are finished with Back stitches around.


The Calyx is sewn in Whipped Spider's Web stitch and the stem is sewn with Stem stitch in the Dark Green

The Spray of Round Buds are done in Blue with satin stitch and back stitch around.
The Stems are sewn in Stem stitch of Medium Green.
The Vine with Leaves at the top right of the Flower are done in Stem stitch and the Leaves in Satin stitch.

The Large Brown Leaf is outlined in Chain stitch with Dark Brown and the Stem of the Leaf is outlined in Stem stitch in Light brown

The pointed flower on the left-hand side.
Each Petal is sewn in satin stitch fanning out from the centre with Light Brown, the a few stitches of dark Brown are sewn fanning out from the centre on the top. In the centre I used Gold Metallic thread in Chain stitch, filled in a bead in the centre. The small leaf shapes are sewn using Lazy Daisy stitch. The Vine is sewn in Stem stitch and the Stem is sewn in Stem stitch in Dark Green.


The tips have a glass bead sewn, the Stamens are sewn in Stem stitch with Medium Blue.
The Ground is done in Herringbone stitches across the middle section in Light Brwon and Light Green threaded together in the needle at the same time. The top line is sewn in Twisted Chain stitch with Dark Brown and the Lower line is sewn in Twisted Chain stitch as well but with Light Brown.
I put my name and the year under the ground: Natalia 2012.


I really had a lot of fun working out this design and wish I will be able to implement some of those incredibly beautiful stitches in miniature! Unfortunately, I am little bit disappointed with myself choosing the DMC floss for work. With all my respect to the DMC company, I don't like to work with this brand and didn't get the effect "WOW' after finishing the project.
Three designs more to go and certainly I will go with silk on those:

Thank you for looking and your patience!
Have a great weekend,
Natalia
10 comments:
Какая необыкновенная, красивая, потрясающая, интересная работа! Очень понравилась. Смотрится просто шикарно!
Только трудно ориентироваться без переводчика. или я его не вижу?
Спасибо, очень жалко, что не перевелось на русский, я описала все виды стижков для етой работы. Я дыже не знаю, как налаживается переводчик, думала, что он автоматически ето делфет для посетителей из других стран.
What a lovely project - and it was fun to see it developing. Thank you for the effort you took in taking pictures for us. To me a clear case of "Turbo-needle stroke again" (LOL).
Have a great weekend!
Birgit
Beautiful! I love crewelwork...it's so fancy, and you do wonderful work.
Beautiful Natalia!!!!!
Beautiful work Natalia - and I do love Jacobean designs. You're right about the silk though. Nothing else gives that sheen or richness. I look forward to seeing the other pieces when you're finished.
Un trabajo precioso!!
Besitos
What a fantastic project.
It was very interestig to see the development.
Thanks for showing.
Greetings
Melanie
Thank you everyone for your nice comments!
Judith, you are so correct about the silk. I think I have to re-do this piece later. Hate the idea to repeat the same though...
Melli, I also like to see somebody's progress. Thought my followers would too..
Lol, Birgit, you jinxed me (he-he-he) - don't want to do anything lately...
Brae, it does look fancy. I can't wait to start another piece, to finish all of them and then... and then I don't know what I will do with them. Frame? too boring...
Wow beautiful design and colors! Great job! xoxo, Amy
Post a Comment