Tuesday, September 20, 2011
Tutorial. A House in a Teacup
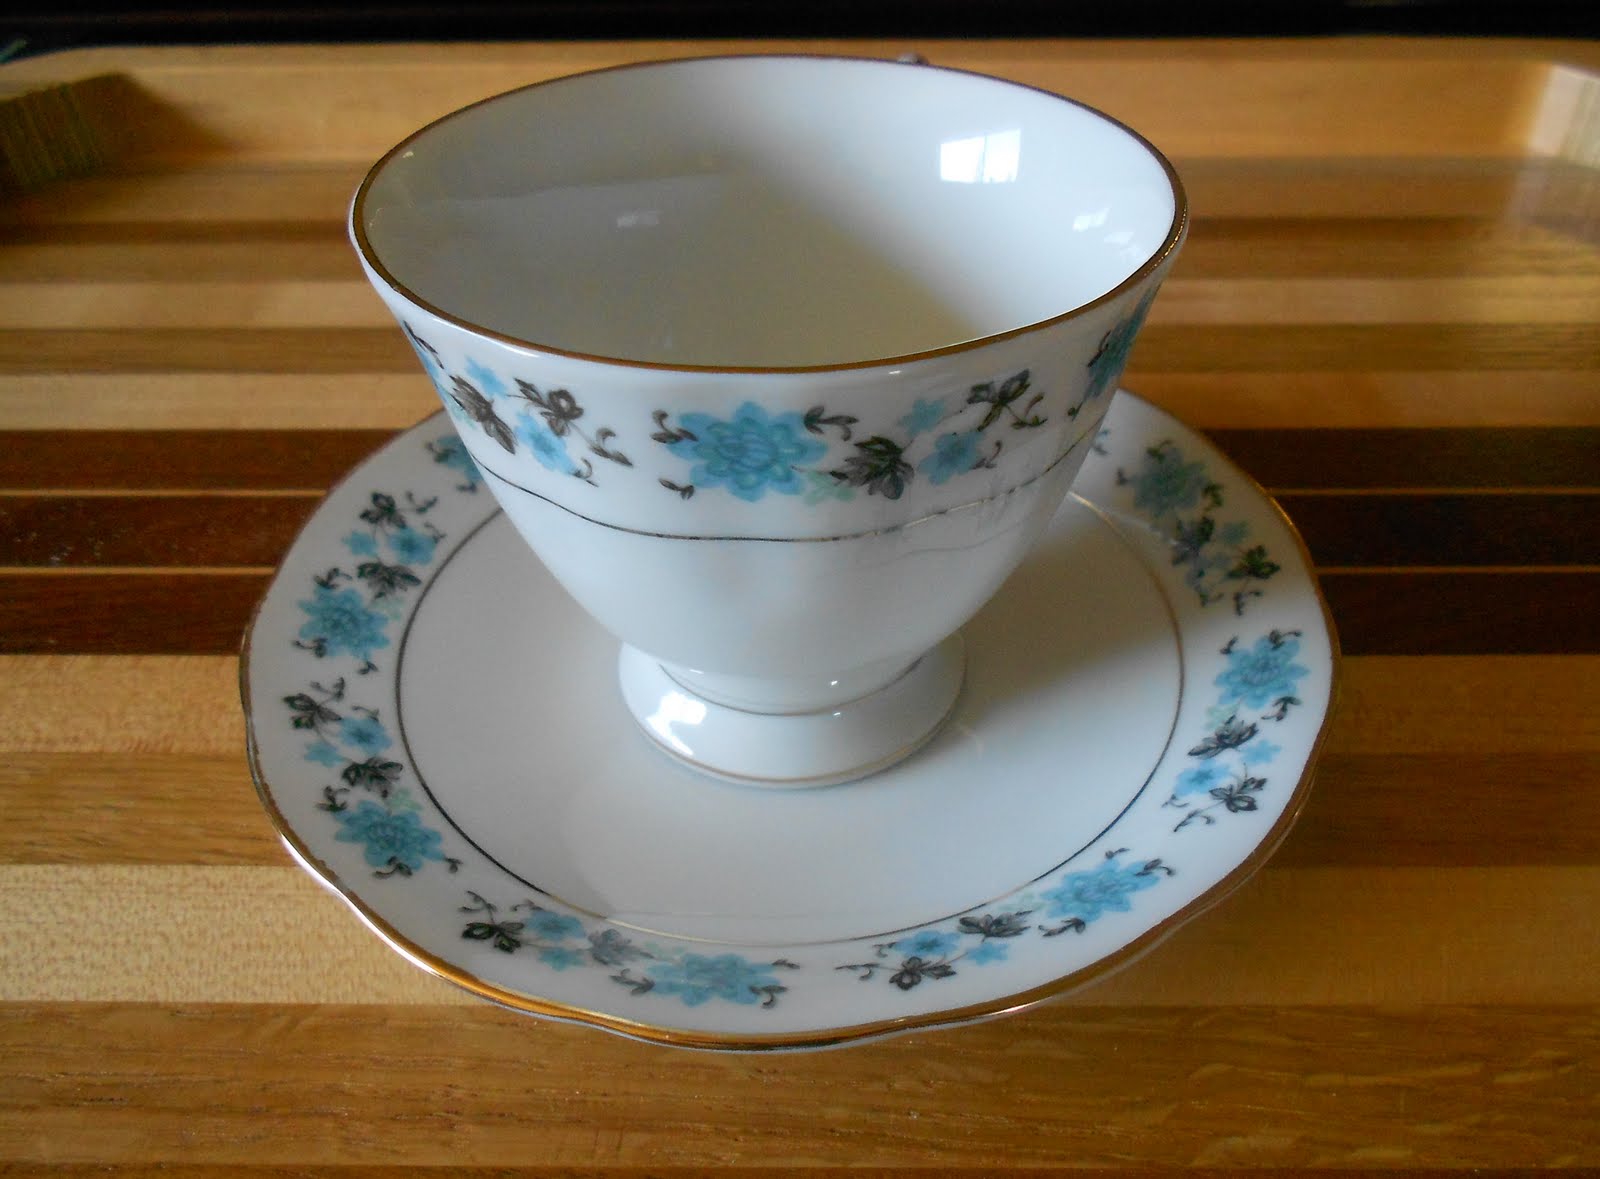
First of all you need to find a teacup and saucer. The size of the teacup depends on your project and what scene actually you would like to make inside. It is not necessary should be a house, it can be any other scene. I was looking for a very beautiful flower design, but then I changed my mind. I didn't want too much colors on my teacup and I thought that saucer will be decorated and covered and nobody will see the design. It is also doesn't matter where your teacup was made in. As you see, everything is a just a matter of your preference. For example, for my other Cup Project I am thinking to use a deep bowl.
This is how my teacup and saucer looked before
Place the teacup on the saucer in the position you would like it to see. When placing the cup be sure to anchore the handle to the saucer if the design will allow and to keep the lip of the cup level or just below the edge of the saucer so your ground will be as flat as possible. The HANDLE SHOULDN'T BE GLUED TO THE SAUCER!,
and glue it, I used 527 Multi-Use Glue (you can buy it at any Craft stores)
Let it dry.
While you are waiting for your teacup to be glued, make a template for a ground. I cut a circle out of paper that had an approx. size of the saucer with a little "tongue" that goes inside the cup and symbolize a ground for the house.
Now, if you look at the next picture, you will see, why I asked you not to glue the handle to the saucer:
Trim the edges of your template, cutting as close to the edges of the saucer as possible, making it even.
Take a chip board
trace your template on it and cut it out
try it on your cup (it should be glued already) and trim it if necessary
Then, paint this chip board in dark green and let it dry.
While it is drying, take a plastic bag (I used just a bag from a grocery store), put some Fine Turf (I used Green Grass),
spread it evenly on the surface
OK, back to the green chip board. Dried? Good! Now you will need General Purpose 45 Spray Adhesive, or you can use a hair spray.
I would advise to go outside, or in the bathroom and spray that dried green piece of chip board with Spray Adhesive (or your hair spray). After that with a sprayed surface put your chip board in Fine Turf and push it all around. I found out that sprinkling green ground cover over doesn't help. Shake the excess, then spray again and "sink" it in Fine Turf again. Shake the excess. Let dry.
Take you green ground cover and glued with 527 or E6000 glue to the saucer. Put it aside.
Time to build a house! Here is the templates, refer to the squares:
Cut house front out of wood - be sure to watch the grain of the wood and make your first cut across the grain - then cut the gable in the front. Cut the top angles of the side pieces - save the triangles to use as the roof on the gable at the front of the house. Decide where you want your window and cut the opening before you assemble the house - remember again to make the cuts across the grain first.
Glue the sides and front together
front view
back view
side view
Try it in your teacup to see if it fits, :)))))
Aren't you tired yet?! If not, let's decorate your house now, and it is all you, without my help. Here some tips for you though:
Stain the frame of the window to match your house trim. Make the windows panes in window by painting with thinned Elmers glue over wax paper. Make take more than one coat for a complete pane of glass. Paint the background color of the house and stain the trim.
Add trim to the house as desired and insert window when dry.
I also used the sand that I brought from the Californian coast last summer for a trimming the base of the house and making the sidewalk (mixed it a little bit with Fine Turf)
Cut and paint shingles (I used chip board).
Glue them to the roof of your house
Dry fit the house to the yard and then glue into place. Add front stoop over the sidewalk where your door will be.
You are done. You are on your own now!
As for me, I added:
vines on the walls and roof, I made a flower bed (on this picture you don't see flowers yet, they haven't grown up yet). I used Green Poly Fiber that has been sprayed and covered with Fine Turf
Don't forget to cut the excess of that Poly Fiber to give it a natural look. On this picture you can see little pieces of Poly Fiber around that has to be cut
I also "planted" bushes, flowers around and a Birch.
For this little project I used little trunk that I bought at the Hobby Lobby, I painted it as a Birch.
I glued the Poly Fiber on the top of each brench
Sprayed it and sprinkled the surface with Turf till I was satisfied with a look.
I added figurines, and... my teacup is still not finished, because I will add more little details around to make it more alive...
I hope it helps! Have a fun!
Monday, September 19, 2011
Romantic Saga: 108. Little Paradise in a Teacup.
He: "Darling, do you remember, when we were young..."
She: "Yes, Sweetheart, I do, I do..."
She: "...we were all over the places, traveled a lot, met people, had parties. Now we stuck to this bench..."
He: "He-he-he, you are funny... No, what I meant to say, that when we were young and decided to spend the rest of our lives together, we made a promise to each other. Do you remember what it was?"
She: "I do, Sweetheart, I do.... We promised each other to be stuck to this bench ever forever, didn't we? Am I correct?"
He: "Hmmm, kinda... We promised each other to be together ever forever, till each of us reaches 108 years, and we made that promise true. Happy Birthday, Darling! Happy 108!
... and they were sitting and talking about what a wonderful life they have been living together, side by side, till each of them has reached 108.
She: "Yes, Sweetheart, I do, I do..."
She: "...we were all over the places, traveled a lot, met people, had parties. Now we stuck to this bench..."
He: "He-he-he, you are funny... No, what I meant to say, that when we were young and decided to spend the rest of our lives together, we made a promise to each other. Do you remember what it was?"
She: "I do, Sweetheart, I do.... We promised each other to be stuck to this bench ever forever, didn't we? Am I correct?"
He: "Hmmm, kinda... We promised each other to be together ever forever, till each of us reaches 108 years, and we made that promise true. Happy Birthday, Darling! Happy 108!
... and they were sitting and talking about what a wonderful life they have been living together, side by side, till each of them has reached 108.
Friday, September 16, 2011
Stitching by Rachel
Today I would like to introduce Rachel from the Netherlands, her work and her blog
http://hannahroet.blogspot.com/.
Rachel is doing tremendously beautiful stitching on a very fine count silk gauze. For example this design of Geisha has been adopted from a real size cross stitch kit and stitched on 90 count silk gauze. Isn't it amazingly detailed work?
This Tabris has been stitched on 72 count silk gauze and currently is located at the Kentucky Gateway Museum Center.
Rachel will be attending the Chicago International show in 2012 under the name "Hannnah Roet". Don't forget to stop by her table. She offers very nice work.
Have a great weekend!
http://hannahroet.blogspot.com/.
Rachel is doing tremendously beautiful stitching on a very fine count silk gauze. For example this design of Geisha has been adopted from a real size cross stitch kit and stitched on 90 count silk gauze. Isn't it amazingly detailed work?
This Tabris has been stitched on 72 count silk gauze and currently is located at the Kentucky Gateway Museum Center.
Rachel will be attending the Chicago International show in 2012 under the name "Hannnah Roet". Don't forget to stop by her table. She offers very nice work.
Have a great weekend!
Thursday, September 15, 2011
GUILD SCHOOL 2012
Today I would like to share my excitement with you: I won a scholarship to the Guild School in Castine, Maine in 2012. There are a lot of wonderful classes offered next year. I haven't got a Catalog with the complete descriptions and pictures yet, but I think I know already what classes I would like to take. I also have to start thinking what I am going to make for an auction.
If you would like to apply for the scholarship for 2013, here is a link where you can read more about it.
http://www.igma.org/guild_school/index.html
I am sure it will be a great experience and a lot of fun!
If you would like to apply for the scholarship for 2013, here is a link where you can read more about it.
http://www.igma.org/guild_school/index.html
I am sure it will be a great experience and a lot of fun!
Tuesday, September 13, 2011
MY NEW BLOG "BIG DEALS ON LITTLE HEELS"
I opened a new blog "Big Deals on Little Heels". This blog will be completely devoted to dollhouse miniatures shoes. Please, check it up: www.bigdealsonlittleheels.blogspot.com. You also can find this blog on the right-hand sidebar under MY OTHER BLOGS.
In a couple of days I will be offering a FIRST GIVEAWAY on my new blog, please, come later to see and to join it.
For now I would like to let you know that I listed some of my handmade shoes on my etsy store that you also can find on the right-hand sidebar.
$20.00
$20.00
$20.00
$25.00
$15.00
Thank you!
In a couple of days I will be offering a FIRST GIVEAWAY on my new blog, please, come later to see and to join it.
For now I would like to let you know that I listed some of my handmade shoes on my etsy store that you also can find on the right-hand sidebar.
$20.00
$20.00
$20.00
$25.00
$15.00
Thank you!
Monday, September 12, 2011
FALL GIVEAWAY 2011!!!!!
JOIN MY FALL GIVEAWAY 2011: 09.13.11 - 09.21.11!!!
I am offering you to participate in my Fall Giveaway 2011.
It will start on the 13th of September, 2011 and will be over on the 21st of September, 2011.
As a Giveaway I offer a 3-piece set of Lady's bed furniture: a bed, a dressing table and a chair. All 3 pieces match each other. They are new, have never been used and still in the original boxes!
The conditions:
1. You have to be a follower of my blog www.scarletsailsminiatures.blogspot.com.
2. You will need to leave a comment on my blog. I want you to write down about who or what inspires you in your life and if you would have been given a $1,000,000.00, what you are going to do with it.
3. You need to copy an image symbolising my Fall Giveaway 2011 and post it on your blog.
4. ... and, please, S M I L E!
Natalia Frank
More detailed pictures:
WWW.SCARLETSAILSMINIATURES.COM
I am offering you to participate in my Fall Giveaway 2011.
It will start on the 13th of September, 2011 and will be over on the 21st of September, 2011.
As a Giveaway I offer a 3-piece set of Lady's bed furniture: a bed, a dressing table and a chair. All 3 pieces match each other. They are new, have never been used and still in the original boxes!
The conditions:
1. You have to be a follower of my blog www.scarletsailsminiatures.blogspot.com.
2. You will need to leave a comment on my blog. I want you to write down about who or what inspires you in your life and if you would have been given a $1,000,000.00, what you are going to do with it.
3. You need to copy an image symbolising my Fall Giveaway 2011 and post it on your blog.
4. ... and, please, S M I L E!
Natalia Frank
More detailed pictures:
WWW.SCARLETSAILSMINIATURES.COM
Subscribe to:
Posts (Atom)


